Wednesday, November 26, 2014

6 channel AAC to AC3 on the fly encoding on the MPV player

Old audio amplifiers usually doesn't support 6 channel AAC audio playback. Let's say that you have video file in the MKV container that contains 6 channel audio in AAC format. In the playback that file is probably downmixed to stereo.

There is no need to buy a new receiver you just need to set your video player to on-the-fly encode those 6ch AAC audio tracks to AC3 audio tracks. That on-the-fly encoding is quite easy to configurate if your video player is MPV player (MPlayer fork).

Small check list before you start


  • Your amplifiers supports Dolby Digital 5.1 (AC3) - most common format that is used in DVD's
  • Your PC is connected to the amplifier using S/PDIF cable
  • Your distribution provides MPV player and AFTEN AC3 encoder

Configure


This way it is done in Debian but you can configure it similar manner in Ubuntu, Arch etc...

First install MPV player:

$ sudo apt-get install mpv

Note: You need to enable deb-multimedia repositories

Then you should install Aften, AC3 encoder

$ sudo apt-get install aften

Then in your home directory make new directory for MPV config files:

$ mkdir .mpv

Then go to the .mpv folder and create two config files example using your filemanager. Files:

config
input.conf


Here is mine content of "config" file... the text in the red is used for AAC to AC3 on-the-fly encoding:


[default]
##################
# video settings #
##################

# Specify default video driver (see --vo=help for a list).

#vo=vdpau
#vo=xv

# Start in fullscreen mode by default.
#fs=yes

# force starting with centered window
geometry=50%:50%

# don't allow a new window to have a size larger than 90% of the screen size
#autofit-larger=90%x90%

# Disable the On Screen Controller (OSC).
#osc=no

# Keep the player window on top of all other windows.
#ontop=yes

#For both AC-3 and DTS passthrough, use ad=spdif:ac3,spdif:dts,
ad=spdif:ac3,spdif:dts,

# Default color corrections
brightness=0
contrast=0
hue=0
saturation=0


##################
# CPU Cores      #
##################

#Number of threads to use for decoding. Whether threading is actually supported depends on codec. 0 means autodetect number of cores on the machine and use that, up to the maximum of 16 (default: 0).
vd-lavc-threads=0


##################
# audio settings #
##################

# Specify default audio driver (see --ao=help for a list).
# Could contain card + device number if needed "ao=alsa:device=[hw:0,3]" - "aplay -l" -command can be used to find right device
ao=alsa
#ao=alsa:device=[hw:0,3]

# Disable softvol usage, and always use the system mixer if available.
#softvol=no

# Scale audio tempo by playback speed without altering pitch. (By default does
# nothing if playback speed is not changed. May introduce artifacts.)
#af=scaletempo

# Output 5.1 audio natively, and upmix/downmix audio with a different format.
# Audio channels - 6 = 5.1, 2 = stereo. You can keep it as 2 and still got 5.1 surround sounds if you have ac3, dts passthough
audio-channels=2


# Disable any automatic remix, _if_ the audio output accepts the audio format.
# of the currently played file.
#audio-channels=empty

#For both AC-3 and DTS passthrough, use ad=spdif:ac3,spdif:dts,
ad=spdif:ac3,spdif:dts,


#On the fly decode 6 channel AAC to AC3 aka DolbyDigital, lavcac3enc[=tospdif[:bitrate[:minchn]]]
af=scaletempo,lavcac3enc=yes:640:3


##################
# sync          #
##################

#sync every 30 frames
autosync=30

# Use 8MB input cache by default. The cache is enabled for network streams only.
#cache-default=8192

# Use 20MB input cache for everything, even local files.
cache=20000

# If a seek is issued, and the target is 1024KB past the cached range, then
# keep reading until the seek target is hit, instead of doing a real seek.
#cache-seek-min=1024

# Disable the behavior that the player will pause if the cache goes below a
# certain fill size.
#cache-pause=no

# Read ahead about 5 seconds of audio and video packets.
#demuxer-readahead-secs=5.0


##################
# VobSubs and     #
# text based     #
# subtitles      #
##################

# Align subs
# Set subtitle position. (100: as low as possible)
#subpos=100
sub-pos=100


# Anti-alias subs. (4: best and slowest)
#spuaa=4
#sub-gauss=<0.0-3.0>
sub-gauss=1.0


# Set language.
slang=fi,fin,en,eng

# Play Finnish audio if available, fall back to English otherwise.
alang=fi,en


# Find the subtitle files, autosub-match=<exact|fuzzy|all> (fuzzy: load all subs containing movie name)
sub-auto=fuzzy

# Set font encoding.
#subfont-encoding=unicode

# Set subtitle file encoding.
#unicode=no
#utf8=no

# Show capitalize versions of Ä and Ö, without this those are displayed as question marks
#subcp=iso8859-15

# Change subtitle encoding. For Arabic subtitles use 'cp1256'.
# If the file seems to be valid UTF-8, prefer UTF-8.
#sub-codepage=utf8:cp1256
#sub-codepage=iso8859-15

# Enable hardware decoding if available. Often, this requires using an certain
# video output, otherwise no hardware decoding will be used.
#hwdec=auto

# Set font size. (2: proportional to movie width)
#subfont-autoscale=2
sub-text-font-size=30

# Set font blur radius. (default: 2)
#Values: <0..20.0>
sub-text-blur=2.0

# Set font outline thickness. (default: 2)
#sub-text-outline=2.0

# Set autoscale coefficient. (default: 5)
#sub-text-scale=3.4

#Use for a widescreen tv so keeps 4:3 content from stretching
monitoraspect="16:9"

############
# Profiles #
############

# The options declared as part of profiles override global default settings,
# but only take effect when the profile is active.
# The following profile can be enabled on the command line with: --profile=vdpau
#[vdpau]
# The profile forces the vdpau VO.
#vo=vdpau
# Use hardware decoding (this might break playback of some h264 files)
#hwdec=vdpau
# Most video filters do not work with hardware decoding.
#vf-clr=yes
# You can also include other configuration files.
#include=/path/to/the/file/you/want/to/include

Optional step: Activate feature to sync your subtitles


Set G an Y keyboard keys to sync out of sync subtitles. This feature is not activated by default so you need to add following to the "input.conf" file:
g sub_step -1
y sub_step +1

Testing


Now you need MKV test file with 6 channel audio.

Download

Then play the downloaded test file:


$ mpv 6ch_aac.mkv

Now you should hear the sounds in the correct speakers. My receiver also displays the Dolby Digital icon.


Tuesday, November 25, 2014

H265 (HEVC) is flowing to the mainstream

The new HandBrake 0.10 seems to contain open source HEVC encoder. HEVC is official 4K BluRay codec and it said to double the data compression ratio compared to H.264/MPEG-4 AVC at the same level of video quality. It can alternatively be used to provide substantially improved video quality at the same bit rate. It can support 8K UHD and resolutions up to 8192x4320.

About HEVC support from the HandBrake 0.10 release blog 

  • Using x265 v1.4
  • This encoder is still early in it's development, so is missing many H.265 features and optimisations. 
  • While this encoder is still fairly new, we have seen some promising results come out of it. It's still under heavy active development and is only going to improve over time!


https://handbrake.fr/

Friday, November 21, 2014

Apple Magic Trackpad on KDE


It seems that it's quite easy to get Apple Magic Trackpad work on linux. Besides the trackpad you will need a bluetooth receiver. The most recent laptops come with a built-in Bluetooth but in my case I needed to buy it for my desktop pc.

Bluetooth receiver


I bought ASUS USB-BT400 bluetooth adapter mainly because it just works out of the box on Linux and it is Bluetooth 4.0 / 3.0 / 2.1 / 2.0 compatible.

On first boot I checked following things

That I have touchpad config tool for KDE. It was missing so installed it.

$ sudo apt-get install kde-config-touchpad

That I have all needed bluetooth applications installed.

dpkg --get-selections | grep 'blue'
bluedevil                                       install
bluetooth                                       install
bluez                                           install
libbluedevil2:amd64                             install
libbluetooth3:amd64                             install

That I can see the bluetooth adapter.

$ lsusb | grep 'ASUS'
Bus 003 Device 005: ID 0b05:17cb ASUSTek Computer, Inc.

After those things I powered up the Apple Magic Trackpad and scanned my bluetooth devices (System settings > Bluetooth)

A new bluetooth adapter found the Apple Wireless Trackpad. I paired and connected it. By the way default pin is: 0 0 0 0

Finally I checked the kernel message details of my Apple devices. The red text lines are for Apple Magic Trackpad and black text for Apple Magic Mouse.

$ dmesg | grep 'magic'
[   37.587869] magicmouse 0005:05AC:030D.0009: unknown main item tag 0x0
[   37.588008] magicmouse 0005:05AC:030D.0009: input,hidraw6: BLUETOOTH HID v3.06 Mouse [Apple Magic Mouse] on 5c:f3:70:63:97:a1
[157856.306955] magicmouse 0005:05AC:030E.000A: unknown main item tag 0x0
[157856.307157] magicmouse 0005:05AC:030E.000A: input,hidraw7: BLUETOOTH HID v1.60 Mouse [Apple Wireless Trackpad] on 5c:f3:70:63:97:a1

Once your trackpad has been paired, the "hid_magicmouse" module should automatically load. Both Apple Magic Mouse and Trackpad uses the same "hid_magicmouse" driver. To verify that it is loaded you can check it in terminal:

$ lsmod | grep 'magic'
hid_magicmouse         12679  0
hid                   102264  6 hidp,hid_generic,usbhid,hid_logitech_dj,hid_magicmouse
If it is not loaded you can load id this way:

$ sudo modprobe hid_magicmouse

Synaptic driver solution


So my Apple Magic Trackpad semi-worked right out of the box on Debian Testing (Jessie). I use KDE as default desktop environment.

What worked out of the box?

  • Mouse movements (horizontal speed was slower than vertical - can be fixed)
  • One finger click (Mouse left button)
  • Two fingers click (Mouse right button)
  • Two fingers gestures (scrolling top/down/left/right)
  • Three fingers click (Paste)
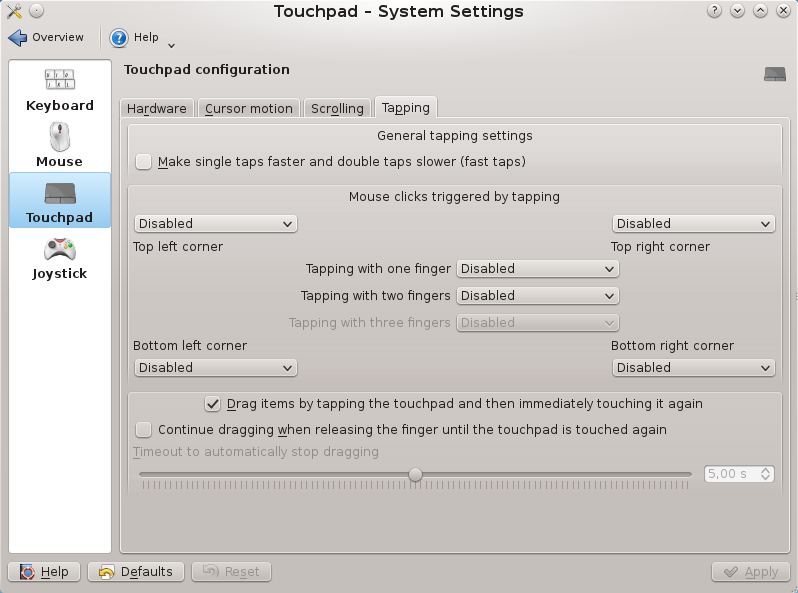
It uses "synaptic" driver out of the box and you can configure following things using the Synaptiks GUI:
(KDE: System settings > Input devices > Touchpad)

  • Hot corner areas (example for scrolling)
  • Tap clicking 
Horizontal scroll fix and other fine-tuning

To fix that slow horizontal scrolling I created following file:

/etc/X11/xorg.conf.d/60-apple-magic-trackpad.conf

And here is my configuration for that file:

# Configuration for fine-tuning only the Apple Magic Trackpad.
Section "InputClass"
    Identifier "Apple Magic Trackpad"
    Driver "synaptics"

    # Match only the Apple Magic Trackpad
    MatchUSBID "05ac:030e"
    MatchIsTouchpad "on"

    # Set resolution tweaks for better response
    Option "VertResolution" "75"
    Option "HorizResolution" "75"

    # Set a timeout for multi finger click so accidental double-clicks don't
    # happen when right clicking and other gestures
    Option "EmulateMidButtonTime" "100"

    # Increase sensitivity
    Option "MinSpeed" "0.50"
    Option "MaxSpeed" "1.00"
    Option "AccelFactor" "0.1"

    # Scrolling
    Option "VertScrollDelta" "100"
    Option "HorizScrollDelta" "100"
EndSection

Those settings were fine on my pc. I have Monitor (4K) and TV (1080p) connected to my pc. Those settings could be different if you don't have that big monitor or multi-monitor system.

Note: Every time you edit that file you will need to restart the X server, I restarted the PC just in case.

The final tuning I did using the Synaptiks GUI for touchpads
(KDE: System settings > Input devices > Touchpad)


MTRACK driver solution


Previous solution wasn't perfect so I did some googling and I found out that I need to install mtrack driver for 4 fingers gestures.

$ sudo apt-get install xserver-xorg-input-mtrack

After driver installation I configured the X server to use that driver. I opened again following configuration file:
/etc/X11/xorg.conf.d/60-apple-magic-trackpad.conf

And I edited it as below:

# Configuration for fine-tuning only the Apple Magic Trackpad.
Section "InputClass"
    Identifier "Apple Magic Trackpad"
    Driver "mtrack"

    # Match only the Apple Magic Trackpad
    MatchUSBID "05ac:030e"
    MatchIsTouchpad "on"

    # Set resolution tweaks for better response

# Tap
Option "TapButton1"                "1"
Option "TapButton2"                  "3"
Option "TapButton3"                 "8"
Option "TapButton4"                 "9"
# Click
Option "ClickFinger1"               "1"
Option "ClickFinger2"                "3"
Option "ClickFinger3"                 "2"
# Two finger swipe
Option "ScrollDistance"            "15"
Option "ScrollUpButton"            "4"
Option "ScrollDownButton"        "5"
Option "ScrollLeftButton"        "6"
Option "ScrollRightButton"        "7"
# Three finger swipe
Option "SwipeDistance"            "180"
Option "SwipeUpButton"            "34"
Option "SwipeDownButton"        "35"
Option "SwipeLeftButton"        "8"
Option "SwipeRightButton"        "9"
# Four finger swipe
Option "Swipe4Distance"            "200"
Option "Swipe4UpButton"            "20"
Option "Swipe4DownButton"        "21"
Option "Swipe4LeftButton"        "23"
Option "Swipe4RightButton"        "22"
# Scaling
Option "ScaleDistance"            "40"
Option "ScaleUpButton"            "12"
Option "ScaleDownButton"        "13"
# Rotate
Option "RotateDistance"            "40"
Option "RotateLeftButton"        "14"
Option "RotateRightButton"        "14"

Option "TapDragEnable"            "true"
Option "TapDragTime"            "350"
Option "TapDragWait"            "40"
Option "TapDragDist"            "200"

Option          "Sensitivity" "0.85"
Option      "FingerHigh" "5"
Option      "FingerLow" "5"
Option          "IgnoreThumb" "true"
Option          "IgnorePalm" "true"

#    Option          "ButtonMoveEmulate" "false"
Option      "ButtonIntegrated" "true"

EndSection
Here is listed all configuration options for Mtrack:
https://github.com/BlueDragonX/xf86-input-mtrack

Those red text numbers in the configuration file are mouse button numbers. A common mouse have by default max 9 buttons and this is the layout for those 9 buttons:
1 = Left click
2 = Middle click
3 = Right click
4 = Scroll top
5 = Scroll down
6 = Scroll left
7 = Scroll right
8 = Back
9 = Forward

The rest button numbers in configuration file is just make it up by myself so there is not any big logic behind on that numbering.

Note: Remember restart the X server or PC after you have modified that 60-apple-magic-trackpad.conf -file.

With that configuration trackpad movents, gestures and clicks got through as mouse buttons. I tested that using the XEV input detection tool.

$ xev

I did those gestures on the trackpad and I sametime checked the log on Konsole. Example 3 fingers swipe left I got following info on ZEV:

ButtonPress event, serial 40, synthetic NO, window 0x7000001,
    root 0xc9, subw 0x0, time 1002624673, (103,137), root:(103,278),
    state 0x10, button 8, same_screen YES

As you can see it was registered as click on mouse button 8.

Then I installed following packages to bind trackpad gestures to various actions.

$ sudo apt-get install xautomation 
$ sudo apt-get install xbindkeys

The final step was bind gestures and clicks to the actions

So I created configuration file for xbindkeys to the home folder

$ xbindkeys -d > ~/.xbindkeysrc

Then I added following rows to that configuration file. Basically I linked my keyboard shortcuts to the mouse buttons that are created by trackpad gestures:

# Minimize toggle - Swipe 4 fingers up - Key: Meta + F8
"xte 'keydown Super_L' 'key F8' 'keyup Super_L'"
  b:20

# View all windows - Swipe 4 fingers down - Key: Meta + F8
"xte 'keydown Control_L' 'key F8' 'keyup Control_L'"
  b:21

# Move current window to TV - Swipe 4 fingers right : Meta+b
"xte 'keydown Super_L' 'key b' 'keyup Super_L'"
  b:22

# Move current window back to the monitor - Swipe 4 fingers left : Meta+v
"xte 'keydown Super_L' 'key v' 'keyup Super_L'"
  b:23

# New Tab - FF - Swipe 3 fingers up : Control+t
#"xte 'keydown Control_L' 'key t' 'keyup Control_L'"
# b:34
 
# Close Tab - FF - Swipe 3 fingers down : Control+w
#"xte 'keydown Control_L' 'key w' 'keyup Control_L'"
# b:35

The last two Firefox actions I disabled because I sometimes launched accidentally those gesture actions.

KDE keyboard shortcut actions I configured using the following GUI:
(KDE: System settings > Shortcuts and Gestures)


In the screenshot above you can see META+V and META+B shortcuts are linked to move window to other screen. In xbindkey configuration those shortcuts are linked to 4 finger swipes by monitor locations (left / right). Nice gesture to move active MPV-videoplayer window to TV!

Short video demonstration about 4 fingers swipe up and down


In the video:
  • 4 fingers swipe up minimize / maximize all windows (toggle)
  • 4 fingers swipe down presents all windows visible (toggle)

Final thoughs


I think synaptics  driver offers much better feel for my trackpad but I cannot activate gestures for 3 and 4 fingers. Let's hope that it will get some new features in near future.

Mtrack driver seems to be working just fine but I still need to fine configure those pressure, distance and other settings to improve more my trackpad experience.

In Debian it seems to be almost impossible to try those other options like Touchegg. If you have some tips how to configure this Apple Magic Trackpad some other-way in Debian, please comment below.

UEFI booting on Linux

All the new laptops and pc's support UEFI. So good bye BIOS, now you have UEFI with more graphics, whistles and bells to manage your computer. The way you boot the OS is changed too.

Before installing the Linux with UEFI booting


To configure your system to support UEFI booting you should check following UEFI settings. Power up your pc and usually you should press F2 or DEL to enter UEFI. If you already have Windows on PC then you can also enter this way to UEFI: http://www.thewindowsclub.com/access-uefi-firmware-settings-windows-8-1

So now you should be in UEFI, please check these settings:
  • Fast boot—This feature can speed up the boot process by taking shortcuts in hardware initialization. Sometimes this is fine, but sometimes it can leave USB hardware uninitialized, which can make it impossible to boot from a USB flash drive or similar device. Thus, disabling fast boot may be helpful, or even required; but you can safely leave it active and deactivate it only if you have trouble getting the Linux installer to boot.
  • Secure Boot—Debian, Fedora, OpenSUSE, Ubuntu, and some other distributions officially support Secure Boot; but if you have problems getting a boot loader or kernel to start, you might want to disable this feature. I personally always do that. To describe how to do so is impossible because the settings vary from one computer to another.
  • CSM/legacy options—If you want to install in EFI mode, set such options off. Some guides recommend enabling these options, and in some cases they may be required—for instance, they may be needed to enable the BIOS-mode firmware in some add-on video cards. In most cases, though, enabling CSM/legacy support simply increases the risk of inadvertently booting your Linux installer in BIOS mode, which you do not want to do. Note that Secure Boot and CSM/legacy options are sometimes intertwined, so be sure to check each one after changing the other.


Hard disk and EFI partition


If your disk already contains an EFI partition (eg if your computer had Windows8 pre-installed), it can be used for Debian too. Do not format it. It is strongly recommended to have only 1 EFI partition per disk.

If you don't have an EFI partition that can be created via GParted.
Size: Should be about 250MiB
Type: FAT32
Other: needs a "boot" flag.

On my system the first partition is the EFI partition.
Without that boot partition you system won't boot after installation. Now your pc should be ready for Linux installation.

rEFInd can be used to fix post-installation issues


rEFInd USB

Go to the author's web page http://www.rodsbooks.com/refind/getting.html. Therein you will find updated direct links to all sorts of packaging. To boot from a rescue media, select either the CD iso or the image for USB stick, most firmware offers the choice nowadays.

Unetbootin can be used to write that image to the USB stick.

Boot you pc with rEFInd USB media

Refind will parse your hard drive for installed kernels, and provide you a graphic menu to boot them. Choose your Linux Kernel and boot it.


Reinstall grub-efi on your hard drive

Check that your EFI system partition (most probably /dev/sda1) is mounted on /boot/efi
mount /dev/sda1 /boot/efi

Check that the computer booted in computer in EFI mode:
[ -d /sys/firmware/efi ] && echo "EFI boot on HDD" || echo "Legacy boot on HDD"
should return "EFI boot on HDD".

Reinstall the grub-efi package
apt-get install --reinstall grub-efi

Put the debian bootloader in /boot/efi and create an appropriate entry in the computer NVRAM
grub-install /dev/sda

You can check afterwards that the the bootloader is existing in /boot/efi/EFI/debian/grubx64.efi and that the nvram entry was properly created.
file /boot/efi/EFI/debian/grubx64.efi

/boot/efi/EFI/debian/grubx64.efi: PE32+ executable (EFI application) x86-64 (stripped to external PDB), for MS Windows

efibootmgr --verbose

You can now reboot, and Grub should greet you.That's all!

Some sources and additional info:
https://wiki.debian.org/GrubEFIReinstall
http://www.rodsbooks.com/linux-uefi/

Thursday, November 20, 2014

Fix to get play Spotify local files on Debian Testing (Jessie)


Updated fix for current Debian testing aka Stretch can be found here.

Spotify needs older versions of libavcodec, libavformat and libavutil to play local files. I found this fix for Ubuntu and I checked the steps that are needed for Debian. Those older files in this blog are extracted by compiling a minimal FFmpeg 0.10.12 from source. This way, we don't have to install an entire FFmpeg + libx264 built for an older version of the library that potentially can disrupt other applications.


To get local files playing, simply follow the steps and run the commands below in a terminal.


  • Select your version of Debian, 32 or 64 bit. If you don't know run this command: uname -r
  • Launch each command row by row (do not copy paste the whole thing and try to run in terminal)
  • NOTE: This does not overwrite any files on Debian
  • Don't forget the ldconfig -command

    (ldconfig creates the necessary links and cache to the most recent shared libraries found in the directories specified on the command line, in the file /etc/ld.so.conf, and in the trusted directories (/lib and /usr/lib). The cache is used by the run-time linker, ld.so or ld-linux.so. ldconfig checks the header and filenames of the libraries it encounters when determining which versions should have their links updated.) 

32-bit
sudo wget https://dl.dropboxusercontent.com/u/8593574/spotify/ffmpeg/32-bit/libavcodec.so.53 -O /usr/lib/i386-linux-gnu/libavcodec.so.53

sudo wget https://dl.dropboxusercontent.com/u/8593574/spotify/ffmpeg/32-bit/libavformat.so.53 -O /usr/lib/i386-linux-gnu/libavformat.so.53

sudo wget https://dl.dropboxusercontent.com/u/8593574/spotify/ffmpeg/32-bit/libavutil.so.51 -O /usr/lib/i386-linux-gnu/libavutil.so.51

sudo ldconfig

64-bit
sudo wget https://dl.dropboxusercontent.com/u/8593574/Spotify/ffmpeg/libavcodec.so.53 -O /usr/lib/x86_64-linux-gnu/libavcodec.so.53

sudo wget https://dl.dropboxusercontent.com/u/8593574/Spotify/ffmpeg/libavformat.so.53 -O /usr/lib/x86_64-linux-gnu/libavformat.so.53

sudo wget https://dl.dropboxusercontent.com/u/8593574/Spotify/ffmpeg/libavutil.so.51 -O /usr/lib/x86_64-linux-gnu/libavutil.so.51

sudo ldconfig

That's all! Following repository can be used to install Spotify on Debian.

Debian

# 1. Add this line to your list of repositories by
#    editing your /etc/apt/sources.list
deb http://repository.spotify.com stable non-free

# 2. If you want to verify the downloaded packages,
#    you will need to add our public key
sudo apt-key adv --keyserver hkp://keyserver.ubuntu.com:80 --recv-keys 94558F59

# 3. Run apt-get update
sudo apt-get update

# 4. Install spotify!
sudo apt-get install spotify-client

Friday, November 14, 2014

SOLVED! Debian mount USB stick always as root and you cannot write it as normal user (Known Debian Jessie USB installation issue)

I just installed Debian Jessie KDE edition ISO and I got problem to save the files to USB memory stick.

Then I checked the the permissions of the USB stick and it was root:root.

I finally fixed it by commenting out following line on /etc/fstab-file:

#/dev/sdf1 /media/usb0 auto rw,user,noauto 0 0

Now it works just great at least in KDE.


The reason for the issue is that if you install Debian from a USB drive, the installer adds sdX1 to fstab and whenever you plug it in the system will mount it as root.

So you should always remember to uncomment that line from fstab after installing from USB.

Tuesday, November 11, 2014

Download subtitles via Dolphin

Introduction to Subliminal

Subliminal is perfect subtitle downloader that comes with an easy CLI (command-line interface) that can be integrated to the Dolphin as service menu.

Subliminal uses multiple providers like:
  •     Addic7ed
  •     OpenSubtitles
  •     Podnapisi
  •     TheSubDB
  •     TvSubtitles
Subliminal web page


Debian installation

sudo apt-get instal python-pip
sudo pip install subliminal


Download a movie

After installation you should test the Sublimal for your movies. If you don't have any movies you can download Sintel.

Sintel the movie (open source)


Download Sintel the movie
More open source movies


Test Subliminal


Use terminal and download subtitle to the movie using following command:

subliminal -l en Name_Of_The_Movie_file.mkv
It should download the subtitle to the same directory. The "-l" sets the subtitle language to be "en" (English) in the example above.

How to use Subliminal.... run this command in terminal:

subliminal --help

KDE Dolphin right click service menu for Sublimal


As root make a new file:

/usr/share/kde4/services/subliminal.desktop

Content of the file:

[Desktop Entry]
Type=Service
X-KDE-ServiceTypes=KonqPopupMenu/Plugin
MimeType=video/*
Actions=DownloadSub

[Desktop Action DownloadSub]
Type=Application
Name=Subliminal subtitle search
Exec=subliminal -m 0 -l en fi --addic7ed-username <username> --addic7ed-password <password> -- %U
Icon=video

The bold text in the example is the search command, you can edit it the way you like. Mine search command finds both English "en" and Finnish "fi" subtitles.

Register to the "addic7ed" and change the <username> and <password> placeholders if you like to use that provider or just remove the option .

When you have saved the file then check that Dolphin is closed. Then open Dolphin, go to the folder that contains some movie files, right click the movie file and select: Actions > Subliminal subtitle search

That's all! It should work now!